


This is a part of my previous post Create a desktop app with pokki. In this tutorial i have explained how to design better pokki , where to write your css code and little about animation.
popup.html was the main file where you are going to put your html code, after opening the pokki by default you can see the rendered output of the popup.html.
Download CurrencyConve for Pokki
HTML Code
Note:Don't change the id or class attributes of wrapper , minimize and scrollable which will be used by the pokki framework.You can still create a pokki without minimize button ,but pokki will not approve the pokki which doesn't meet their requirement.
CSS PART
When it come to css part you have edit in default.css file in css folder. If you need to seprate the deafult css code for pokki, you can create a anoher file and just include it in the head tag in the popup.html.
" wrapper " is the main container div of our pokki, to change the background or text color edit the css in the default.css.Now i am adding black background and white color text for our pokki.
Create a new file app.css and paste the following code in it and include the file in the popup.html.
After adding these code by re-launching the app.To see how to add your pokki app for development refer the previous tutorial.
Now this is how our app will look because so far we have just designed the internal structure of the pokki.With this default width and height we have the scroll often, so now we are going to change the height and the width of the pokki window.
To change the pokki window size we have to use pokki api.Just add the following code in the popup.html inside the script tags.

Now change the height of the #wrapper and .scrollable in the default.css to fit background to the pokki window.The final result look like this
I hope this tutorial is useful,if you have any query just drop your query bellow we are ready to answer your question.
popup.html was the main file where you are going to put your html code, after opening the pokki by default you can see the rendered output of the popup.html.
Download CurrencyConve for Pokki
HTML Code
<div id="wrapper">
<a id="minimize" href="#"></a>
<div id="content">
<div class="scrollable">
<div class="content">
<div id="container">
    <div class="title">
         Currency Converter
    </div>
    <div class="amount">
         Amount: <input type="textbox" class="input" id="amount"/>
    </div>
    <div class="from">
         From:<br/>
        <select id="from">
            <option value='AUD'>AUD - Australian Dollar</option>
            <option value='CAD'>CAD - Canadian Dollar</option>
            <option value='CHF'>CHF - Swiss Franc</option>
            <option value='CNY'>CNY - Chinese Yuan Renminbi</option>
            <option value='DKK'>DKK - Danish Krone</option>
            <option value='EUR'>EUR - Euro</option>
            <option value='GBP'>GBP - British Pound</option>
            <option value='HKD'>HKD - Hong Kong Dollar</option>
            <option value='HUF'>HUF - Hungarian Forint</option>
            <option value='INR'>INR - Indian Rupee</option>
            <option value='JPY'>JPY - Japanese Yen</option>
            <option value='MXN'>MXN - Mexican Peso</option>
            <option value='MYR'>MYR - Malaysian Ringgit</option>
            <option value='NOK'>NOK - Norwegian Krone</option>
            <option value='NZD'>NZD - New Zealand Dollar</option>
            <option value='PHP'>PHP - Philippine Peso</option>
            <option value='RUB'>RUB - Russian Ruble</option>
            <option value='SEK'>SEK - Swedish Krona</option>
            <option value='SGD'>SGD - Singapore Dollar</option>
            <option value='THB'>THB - Thai Baht</option>
            <option value='TRY'>TRY - Turkish Lira</option>
            <option value='USD' selected>USD - US Dollar</option>
            <option value='ZAR'>ZAR - South African Rand</option>
        </select>
    </div>
    <div class="to">
         To:<br/>
        <select id="to">
            <option value='AUD'>AUD - Australian Dollar</option>
            <option value='CAD'>CAD - Canadian Dollar</option>
            <option value='CHF'>CHF - Swiss Franc</option>
            <option value='CNY'>CNY - Chinese Yuan Renminbi</option>
            <option value='DKK'>DKK - Danish Krone</option>
            <option value='EUR' selected="selected">EUR - Euro</option>
            <option value='GBP'>GBP - British Pound</option>
            <option value='HKD'>HKD - Hong Kong Dollar</option>
            <option value='HUF'>HUF - Hungarian Forint</option>
            <option value='INR'>INR - Indian Rupee</option>
            <option value='JPY'>JPY - Japanese Yen</option>
            <option value='MXN'>MXN - Mexican Peso</option>
            <option value='MYR'>MYR - Malaysian Ringgit</option>
            <option value='NOK'>NOK - Norwegian Krone</option>
            <option value='NZD'>NZD - New Zealand Dollar</option>
            <option value='PHP'>PHP - Philippine Peso</option>
            <option value='RUB'>RUB - Russian Ruble</option>
            <option value='SEK'>SEK - Swedish Krona</option>
            <option value='SGD'>SGD - Singapore Dollar</option>
            <option value='THB'>THB - Thai Baht</option>
            <option value='TRY'>TRY - Turkish Lira</option>
            <option value='USD'>USD - US Dollar</option>
            <option value='ZAR'>ZAR - South African Rand</option>
        </select>
    </div>
    <div class="Button">
        <a href="javascript:void(0);" class="button" id="convert">Convert</a>
            <span id="loader" style="display:none;">
                <img src="./img/ajax-loader.gif"/>
            </span>
    </div>
</div>
<!-- Body Container Ends -->
<!-- Result Container  -->
<div id="result_container" style="display:none;">
    <div id="result">
    </div>
    <div class="back">
        <a href="javascript:void(0);" id="back">Back</a>
    </div>
</div>
<!-- Result Container Ends -->
</div>
</div>
</div>
</div>
<div id="splash">
</div>
<div id="atom">
</div>
Note:Don't change the id or class attributes of wrapper , minimize and scrollable which will be used by the pokki framework.You can still create a pokki without minimize button ,but pokki will not approve the pokki which doesn't meet their requirement.
CSS PART
When it come to css part you have edit in default.css file in css folder. If you need to seprate the deafult css code for pokki, you can create a anoher file and just include it in the head tag in the popup.html.
" wrapper " is the main container div of our pokki, to change the background or text color edit the css in the default.css.Now i am adding black background and white color text for our pokki.
#wrapper {
    color:#FFF;
    margin:auto;
    width:500px;
    height:300px;
    position:relative;
    opacity:0;
    background: url('../img/bg.png') #000;
}
Create a new file app.css and paste the following code in it and include the file in the popup.html.
#container {
    background:#3c3459;
    height:400px;
    width:400px;
    margin:0px auto;
    border:0px;
    border-radius:5px;
    opacity:0.8;
}
#result_container {
    background:#3c3459;
    height:250px;
    width:400px;
    margin:0px auto;
    border:0px solid;
    border-radius:5px;
    opacity:0.5;
}
#result {
    width:70%;
    padding:30px 80px;
    height:25px;
    font-size:15px;
    font-weight:bold;
    color:#da4214;
}
.back {
    width:40%;
    padding:15px 120px;
    height:25px;
    font-size:15px;
    font-weight:bold;
}
.title {
    width:40%;
    padding:15px 120px;
    height:25px;
    font-size:15px;
    font-weight:bold;
}
.amount {
    width:45%;
    padding:20px 110px;
    height:30px;
}
.from {
    width:45%;
    padding:20px 110px;
    height:40px;
}
.to {
    width:45%;
    padding:20px 110px;
    height:40px;
}
.Button {
    width:45%;
    padding:20px 110px;
    height:40px;
}
select {
    width:150px;
    padding:5px;
}
.input {
    padding:5px;
    font-size:15px;
    text-shadow:0px 1px 0px #fff;
    outline:none;
    -webkit-border-radius:3px;
    -moz-border-radius:3px;
    border-radius:3px;
    border:1px solid #e1e1e1;
    -webkit-box-shadow:2px 2px 0px #efefef;
    -moz-box-shadow:2px 2px 0px #efefef;
    box-shadow:2px 2px 0px #efefef;
}
.input:focus {
    -webkit-box-shadow:0px 0px 5px #007eff;
    -moz-box-shadow:0px 0px 5px #007eff;
    box-shadow:0px 0px 5px #007eff;
}
.button {
    background:#0068A9;
    /* FF3.6+*/ border:1px solid #0068A9;
    padding:4px 12px;
    -moz-border-radius:3px;
    -webkit-border-radius:3px;
    border-radius:3px;
    color:#FFF;
    display:inline-block;
    font-size:11px;
    font-weight:bold;
    text-decoration:none;
    cursor:pointer;
    margin-bottom:20px;
    line-height:21px;
    font-family: Helvetica,Arial,sans-serif;
}
After adding these code by re-launching the app.To see how to add your pokki app for development refer the previous tutorial.
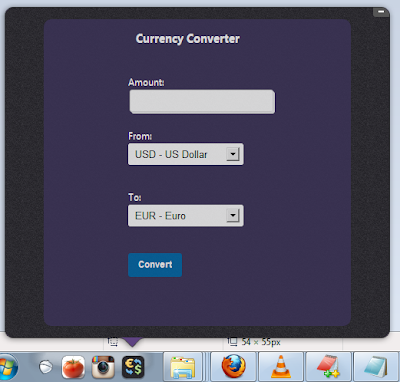
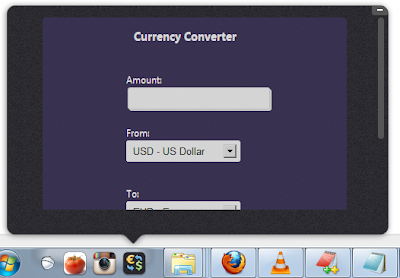
Now this is how our app will look because so far we have just designed the internal structure of the pokki.With this default width and height we have the scroll often, so now we are going to change the height and the width of the pokki window.
To change the pokki window size we have to use pokki api.Just add the following code in the popup.html inside the script tags.
<script type="text/javascript">
    pokki.setPopupClientSize(500, 430);
</script>
Now change the height of the #wrapper and .scrollable in the default.css to fit background to the pokki window.The final result look like this
I hope this tutorial is useful,if you have any query just drop your query bellow we are ready to answer your question.
 |
About Editorial Staff Nathan Shri is a Web Developer ,Opensource lover,and the editor of the codingwoo based in India ,who loves to learn new stuffs and and share.You can be his friend on Facebook. |