|
|
Coding Woo
Codingwoo provides resources,tutorial and trend for web developer
Many freelancer and blogger has started to take payment using paypal for selling their service or product.Most of them use HTML hidden variable in their checkout form.But i believe it is not a safe method , since we can edit html code using firebug or any other console.  Today i am sharing a secure and simple way to accept payment with paypal just like advance payment gateway.
Step1: Designing your cart page.
In the step 1 your going to design the cart page in your website.Create a index.html or add the following code to your cart page Html Code
<div id="container">
<div id="cart">
<h2>Check out Form</h2>
<form action="checkout.php" method="POST">
 <table>
 <tr>
     <td>
         Select the product you like to buy<br/>
         <select name="ProductName">
             <option value="0">Select</option>
             <option value="1">Facebook Fan Page</option>
             <option value="2">Wordpress Theme</option>
         </select>
     </td>
 </tr>
 <tr>
     <td>
         Select the amount of<br/>
         <select name="amount">
             <option value="0">Select</option>
             <option value="1">1</option>
             <option value="2">2</option>
             <option value="2">3</option>
         </select>
     </td>
 </tr>
 <tr>
     <td><input type="submit" value="Pay with paypal"/></td>
 </tr>
 </table>
</form>
</div>
</div>
body{
font-family:'segoe ui';
}
select{
padding:5px;
margin:10px 0px;
}
#container{
margin:100px auto;
padding:20px;
width:450px;
background:#EEE;
border:1px solid #CCC;
}
#cart{
width:100%;
height:100%;
}
Step2:
In this part we are going to add the logic of the payment gateway.Since we are going to submit the form onload user can't change the amount value,which i believe as the secure one.Create a new page checkout.php and add the following code in it.
HTML Code <body onload="return checkout();">
<h3>Processing..</h3>
<form action="https://www.paypal.com/cgi-bin/webscr" method="post" id="paypal">
<input type="hidden" name="cmd" value="_xclick">
<input type="hidden" name="business" value="codingwoo@gmail.com">
<input type="hidden" name="item_name" value="<?php echo $item_name;?>">
<input type="hidden" name="quantity" value="<?php echo$_POST['amount'];?>">
<input type="hidden" name="item_number" value="<?php echo $_POST['ProductName'];?>">
<input type="hidden" name="amount" value="<?php echo $amount;?>">
<input type="hidden" name="no_shipping" value="0">
<input type="hidden" name="no_note" value="1">
<input type="hidden" name="currency_code" value="USD">
<input type="hidden" name="lc" value="AU">
<input type="hidden" name="bn" value="PP-BuyNowBF">
</form>
</body>
<script type="text/javascript">
<!--
function checkout(){
document.forms["paypal"].submit();
}
//-->
<?php
error_reporting(0);
    switch ($_POST['ProductName'])
    {
    case 1:
      $item_name = 'Facebook Fan Page';
      $amount = $_POST['amount'] * 9;// add your product or service price
      break;
    case 2:
      $item_name = 'Wordpress Theme';
      $amount = $_POST['amount'] * 25;// add your product or service price
      break;
    }
?>
<input type="hidden" name="return" value="your success message url">
I hope this tutorial is more useful , if you have any query or need to work for you contact us.
Today we like to share some useful resource and snippet for web developers and web designers. I hope often i like to share some valuable resource from this post.
1. Input box with voice recognition.  One of my client need his input box to be voice recognized just like Google search.Where if you speak some thing that will be converted to text.Today i like to share a simple code snippet to creating a voice recognized input box.
<input type='text' x-webkit-speech/>
x-webkit-speech is supported by only by chrome.
2.CSS3 Graph Animation. A Simple mind blowing graph animation with css3.
3.Sharpen Images with PHP GD.  <?php
function imagesharpen( $image) {
$matrix = array(
array(-1, -1, -1),
array(-1, 16, -1),
array(-1, -1, -1),
);
$divisor = array_sum(array_map('array_sum', $matrix));
$offset = 0;
imageconvolution($image, $matrix, $divisor, $offset);
return $image;
}
?>
4.Javascript Pointers
Pointers are a powerful part of C, and they're so simple that it's not too hard to replicate them in other (powerful) languages. I made a pointer system not unlike C's in just a few lines of javascript.
var uid;
(function() {
 var lastId = 0;
 uid = function() {
   return lastId++;
 };
}());

global.$ = function(val) {
 var id = uid();
 global.$[id] = val;
 Object.defineProperty(global.$, id, {
   get: function() {
     return val;
   },
   set: function(newVal) {
     val = newVal;
     return newVal;
   },
   enumerable: false
 })
 return id;
};

global.$.free = function(ptr) {
 delete global.$[ptr];
};
5.Automatic updating timestamp,facebook style. ( function($){
$.fn.updateTime = function(){
this.each( function(){
var $this = $(this);
if( $this.parent().hasClass('stopUpdateTime') === false )
{
$.update( $this );
setInterval( function(){
$.update( $this );
}, 60000 );
}
});
}
var $lang = {
0: 'less than a minute ago',
1: '1 minute ago',
59: '%distance minutes ago',
118: 'an hour ago',
1439: '%r hours ago',
2879: 'Yesterday at %h:%i',
14567: '%l at %h:%i',
},
$default = '%d %f%y at %h:%i',
$days = ['Monday','Tuesday','Wednesday','Thursday','Friday','Saturday','Sunday'],
$months = ['January','February','March','April','May','June','July','August','September','October','November','December'];
$.update = function( $this )
{
if( $this.attr('title') != 'undefined' )
{
var $date = new Date( $this.attr('title') );
var $timestamp = $this.attr('title');
if( $date == 'Invalid Date' )
{
$date = new Date( $this.attr('title') * 1000 );
$timestamp = ( $this.attr('title') * 1000 );
}
var $time = new Date();
var $distance = Math.round( Math.abs( $time - $timestamp ) / 60000 );
var $return = '';
for( i in $lang )
{
if( $return == '' && $distance <= i )
{
var $r = Math.round( $distance / 60 ),
$h = ( ( $date.getHours() < 10 ) ? '0' : '' ) + $date.getHours(),
$i = ( ( $date.getMinutes() < 10 ) ? '0' : '' ) + $date.getMinutes(),
$l = $days[ $date.getDay() ];
$return = $lang[i]
.replace(/%distance/i, $distance)
.replace(/%r/i, $r)
.replace(/%h/i, $h)
.replace(/%i/i, $i)
.replace(/%l/i, $l);
}
}
if( $return == '' )
{
var $d = ( ( $date.getDate() < 10 ) ? '0' : '' ) + $date.getDate(),
$f = $months[ $date.getMonth() ],
$y = ( $time.getFullYear() == $date.getFullYear() ) ? '' : ' ' + $date.getFullYear(),
$h = ( ( $date.getHours() < 10 ) ? '0' : '' ) + $date.getHours(),
$i = ( ( $date.getMinutes() < 10 ) ? '0' : '' ) + $date.getMinutes();
$this.html(
$default
.replace(/%d/i, $d)
.replace(/%f/i, $f)
.replace(/%y/i, $y)
.replace(/%h/i, $h)
.replace(/%i/i, $i)
);
}
else
$this.html( $return );
}
}
} )(jQuery);
$(document).ready(function(){
$('abbr.time').updateTime();
});
This is a part of my previous post Create a desktop app with pokki. In this tutorial i have explained about the development part of the app.Already we have explained you about the file structure and the basic API of the pokki in the previous versions.
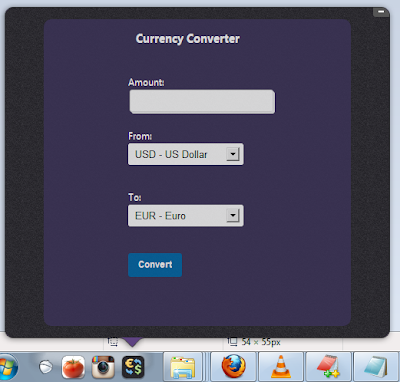
Download CurrencyConve for PokkiBefore starting to add the functionality part of the app, let us see the basic architecture of the pokki app. In the above diagram you can see the how pokki app is working.As we said before popup.html was the main page of the app, and if you need a functionality or update to run on the background use background.html.
We can communicate from popup.html to background.html using Remote Procedure Call.Using background.html you can update any badge notification , listen to the Context Menu , caching data.
Let us move to the app, we are not going to create a new function or class for online exchange rate.We are going to use money.js a javascript currency conversion library get exchange rate from openexchangerates.org.
Step1:
Download money.js and paste the currency conversion library in js folder.
Step2:
Create app2.js and put the following code in it, since we have app.js already i am using app2.js. $(document).ready(function() {
$('#convert').click(function() {
$('#loader').show();
var amount = $('#amount').val();
var from = $('#from').val();
var to = $('#to').val();
$.getJSON(
'http://openexchangerates.org/latest.json',
function(data) {
// Check money.js has finished loading:
if ( typeof fx !== "undefined" && fx.rates ) {
fx.rates = data.rates;
fx.base = data.base;
} else {
// If not, apply to fxSetup global:
var fxSetup = {
rates : data.rates,
base : data.base
}
}
var v = fx.convert(amount, {from: from, to: to});
$('#loader').hide();
$('#container').hide();
$('#result_container').show();
$('#result').html( amount +' '+ from + ' = ' + v +' '+ to );
}
);
});
$('#back').click(function() {
$('#container').show();
$('#result_container').hide();
});
});
Step3:
Add the following code to popup.html head section.
<script language="javascript" src="https://ajax.googleapis.com/ajax/libs/jquery/1.6.4/jquery.min.js"></script>
<script language="javascript" src="js/money.js"></script>
<script language="javascript" src="js/app2.js"></script>
Now relaunch the app and you can see the exchange rate.Very soon you can see our tutorial app in pokki. Since it's basic app for only aim of motivating the developer to create a pokki apps we are not competing with any other apps. I hope this basic tutorial was more useful if you have any queries about developing app just leave a comment down or contact via facebook.
Read more
This is a part of my previous post Create a desktop app with pokki. In this tutorial i have explained how to design better pokki , where to write your css code and little about animation.
popup.html was the main file where you are going to put your html code, after opening the pokki by default you can see the rendered output of the popup.html.
Download CurrencyConve for PokkiHTML Code<div id="wrapper">
<a id="minimize" href="#"></a>
<div id="content">
<div class="scrollable">
<div class="content">
<div id="container">
<div class="title">
Currency Converter
</div>
<div class="amount">
Amount: <input type="textbox" class="input" id="amount"/>
</div>
<div class="from">
From:<br/>
<select id="from">
<option value='AUD'>AUD - Australian Dollar</option>
<option value='CAD'>CAD - Canadian Dollar</option>
<option value='CHF'>CHF - Swiss Franc</option>
<option value='CNY'>CNY - Chinese Yuan Renminbi</option>
<option value='DKK'>DKK - Danish Krone</option>
<option value='EUR'>EUR - Euro</option>
<option value='GBP'>GBP - British Pound</option>
<option value='HKD'>HKD - Hong Kong Dollar</option>
<option value='HUF'>HUF - Hungarian Forint</option>
<option value='INR'>INR - Indian Rupee</option>
<option value='JPY'>JPY - Japanese Yen</option>
<option value='MXN'>MXN - Mexican Peso</option>
<option value='MYR'>MYR - Malaysian Ringgit</option>
<option value='NOK'>NOK - Norwegian Krone</option>
<option value='NZD'>NZD - New Zealand Dollar</option>
<option value='PHP'>PHP - Philippine Peso</option>
<option value='RUB'>RUB - Russian Ruble</option>
<option value='SEK'>SEK - Swedish Krona</option>
<option value='SGD'>SGD - Singapore Dollar</option>
<option value='THB'>THB - Thai Baht</option>
<option value='TRY'>TRY - Turkish Lira</option>
<option value='USD' selected>USD - US Dollar</option>
<option value='ZAR'>ZAR - South African Rand</option>
</select>
</div>
<div class="to">
To:<br/>
<select id="to">
<option value='AUD'>AUD - Australian Dollar</option>
<option value='CAD'>CAD - Canadian Dollar</option>
<option value='CHF'>CHF - Swiss Franc</option>
<option value='CNY'>CNY - Chinese Yuan Renminbi</option>
<option value='DKK'>DKK - Danish Krone</option>
<option value='EUR' selected="selected">EUR - Euro</option>
<option value='GBP'>GBP - British Pound</option>
<option value='HKD'>HKD - Hong Kong Dollar</option>
<option value='HUF'>HUF - Hungarian Forint</option>
<option value='INR'>INR - Indian Rupee</option>
<option value='JPY'>JPY - Japanese Yen</option>
<option value='MXN'>MXN - Mexican Peso</option>
<option value='MYR'>MYR - Malaysian Ringgit</option>
<option value='NOK'>NOK - Norwegian Krone</option>
<option value='NZD'>NZD - New Zealand Dollar</option>
<option value='PHP'>PHP - Philippine Peso</option>
<option value='RUB'>RUB - Russian Ruble</option>
<option value='SEK'>SEK - Swedish Krona</option>
<option value='SGD'>SGD - Singapore Dollar</option>
<option value='THB'>THB - Thai Baht</option>
<option value='TRY'>TRY - Turkish Lira</option>
<option value='USD'>USD - US Dollar</option>
<option value='ZAR'>ZAR - South African Rand</option>
</select>
</div>
<div class="Button">
<a href="javascript:void(0);" class="button" id="convert">Convert</a>
<span id="loader" style="display:none;">
<img src="./img/ajax-loader.gif"/>
</span>
</div>
</div>
<!-- Body Container Ends -->
<!-- Result Container -->
<div id="result_container" style="display:none;">
<div id="result">
</div>
<div class="back">
<a href="javascript:void(0);" id="back">Back</a>
</div>
</div>
<!-- Result Container Ends -->
</div>
</div>
</div>
</div>
<div id="splash">
</div>
<div id="atom">
</div>
:Don't change the id or class attributes of wrapper , minimize and scrollable which will be used by the pokki framework.You can still create a pokki without minimize button ,but pokki will not approve the pokki which doesn't meet their requirement. CSS PARTWhen it come to css part you have edit in default.css file in css folder. If you need to seprate the deafult css code for pokki, you can create a anoher file and just include it in the head tag in the popup.html. " wrapper " is the main container div of our pokki, to change the background or text color edit the css in the default.css.Now i am adding black background and white color text for our pokki. #wrapper {
color:#FFF;
margin:auto;
width:500px;
height:300px;
position:relative;
opacity:0;
background: url('../img/bg.png') #000;
}
Create a new file app.css and paste the following code in it and include the file in the popup.html. #container {
background:#3c3459;
height:400px;
width:400px;
margin:0px auto;
border:0px;
border-radius:5px;
opacity:0.8;
}
#result_container {
background:#3c3459;
height:250px;
width:400px;
margin:0px auto;
border:0px solid;
border-radius:5px;
opacity:0.5;
}
#result {
width:70%;
padding:30px 80px;
height:25px;
font-size:15px;
font-weight:bold;
color:#da4214;
}
.back {
width:40%;
padding:15px 120px;
height:25px;
font-size:15px;
font-weight:bold;
}
.title {
width:40%;
padding:15px 120px;
height:25px;
font-size:15px;
font-weight:bold;
}
.amount {
width:45%;
padding:20px 110px;
height:30px;
}
.from {
width:45%;
padding:20px 110px;
height:40px;
}
.to {
width:45%;
padding:20px 110px;
height:40px;
}
.Button {
width:45%;
padding:20px 110px;
height:40px;
}
select {
width:150px;
padding:5px;
}
.input {
padding:5px;
font-size:15px;
text-shadow:0px 1px 0px #fff;
outline:none;
-webkit-border-radius:3px;
-moz-border-radius:3px;
border-radius:3px;
border:1px solid #e1e1e1;
-webkit-box-shadow:2px 2px 0px #efefef;
-moz-box-shadow:2px 2px 0px #efefef;
box-shadow:2px 2px 0px #efefef;
}
.input:focus {
-webkit-box-shadow:0px 0px 5px #007eff;
-moz-box-shadow:0px 0px 5px #007eff;
box-shadow:0px 0px 5px #007eff;
}
.button {
background:#0068A9;
/* FF3.6+*/ border:1px solid #0068A9;
padding:4px 12px;
-moz-border-radius:3px;
-webkit-border-radius:3px;
border-radius:3px;
color:#FFF;
display:inline-block;
font-size:11px;
font-weight:bold;
text-decoration:none;
cursor:pointer;
margin-bottom:20px;
line-height:21px;
font-family: Helvetica,Arial,sans-serif;
}
After adding these code by re-launching the app.To see how to add your pokki app for development refer the previous tutorial. 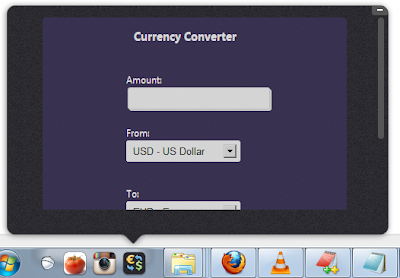 Now this is how our app will look because so far we have just designed the internal structure of the pokki.With this default width and height we have the scroll often, so now we are going to change the height and the width of the pokki window. To change the pokki window size we have to use pokki api.Just add the following code in the popup.html inside the script tags. <script type="text/javascript">
pokki.setPopupClientSize(500, 430);
</script>
 Now change the height of the #wrapper and .scrollable in the default.css to fit background to the pokki window.The final result look like this I hope this tutorial is useful,if you have any query just drop your query bellow we are ready to answer your question.
Read more
|